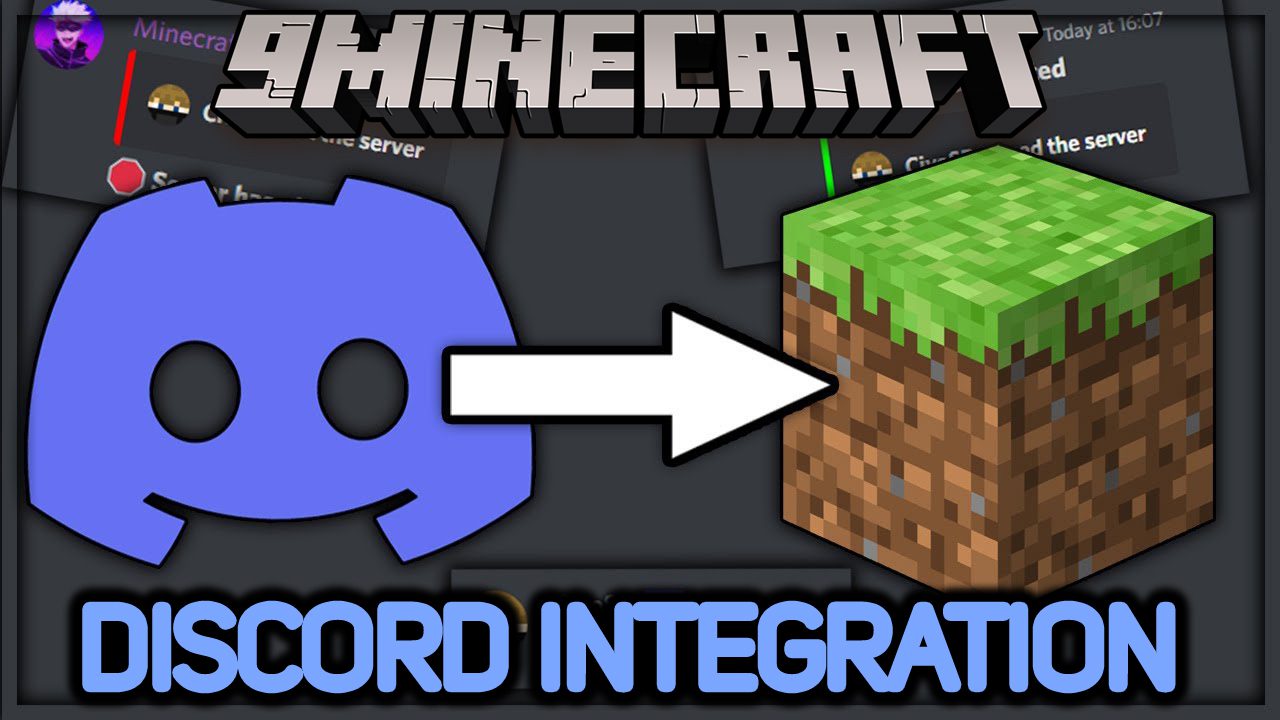
Discord Integration Mod (1.20.4, 1.19.4) – Chat Linking Between Discord and Minecraft
Discord Integration Mod (1.20.4, 1.19.4) connects the Minecraft chat with a Discord chat. This mod also adds Discord command integration for the Mods Dimension Access Manager and More MobGriefing Options. This Mod only works on the server side and won’t work on the client side. When sharing a world of a server, where Discord Integration is installed, remember to remove “discordintegration-server.toml” file in the “serverconfig” folder, to protect your bot token. You can regenerate the bot token in the Discord Developers Site on the “Bot tab”.
Features:
Chat
- Minecraft > Discord
- Everything written in the Minecraft chat is added to the Discord chat by a Discord bot.
- Additional death messages, advancements messages are sent to Discord.
- The “say”- and the “me”-command has been changed and sent their messages to Discord too.
- Server started and server stopped messages can be customized in the config.
- Discord > Minecraft
- Every message except from bots are sent to the Minecraft chat.
- Bot messages can be sent to the Minecraft chat, if it is activated in the config.
- The max length of messages transmitted from Discord to Minecraft can be configured to prevent spam. An error message is shown in the Discord chat, if the message is too long.
- Messages, which are commands, are also not sent to the Minecraft chat.
- There are default commands added by Discord Integration, custom commands can be added in the config. The command prefix can be configured in the config too.
Management
- The “management” part of Discord Integration consists of two parts, the management channel and the management role.
- In the management channel, all Discord Integration commands can be used. Also, messages about server start, stop and crash, player joined and left are shown. If the whitelist feature is activated, additional messages will be shown, if a Minecraft and Discord account are linked or unlinked and if a Minecraft account is added or removed from the whitelist.
- Additionally, the management channel can be used for conversations between the moderators and admins of the Minecraft server, which will not be shown in the Minecraft chat.
- With the management role commands can be executed that are marked as management commands.
Whitelist
- From the whitelist usable by Discord Integration requires the whitelist to be activated in the server.properties file. It has two mechanisms to secure the whitelist, role and single link management, which are described in the following sections. Linkings from users leaving the Discord server will automatically be removed. If the linkings are out of sync, for example because the Minecraft server was offline or the Discord API had issues, this can be solved by restarting the server, which resyncs the linkings. The config key “whitelist.use_role” is used to set, if the use role mechanism is active, and the config key “whitelist.use_single_linking_management” is used to set, if the single link management is active. To create linkings users can use the “!link” and “!unlink” commands in the chat channel. Important: The “!link” and “!unlink” commands have to be enabled in the config, before they can be used.
Only linking
- If both mechanisms are deactivated, the user only has to create a linking to get onto the whitelist.
Role
- If the role mechanism is active, the user has to have the role whose ID is set to the config key “whitelist.role_id”. The role has to be assigned by a moderator of the Discord server. If the “@everyone” role is used, the user just has to create a liking to get onto the whitelist.
Single Link Management
For the Single Link Management two config values have to be set. The “whitelist.linking_management_channel_id” has to have the channel ID set of the channel in which the “Linking Messages” are shown. The “whitelist.single_linking_management_role_id” is the role ID of the role that is needed to activate or deactivate a linking. The linking can be simply activated or deactivated by clicking the tick or “X” reaction below the message. On startup, all linking messages in the link management channel are updated, this takes about 1 second per message due to Discord API restrictions.
Role + Single Link Management:
- The Discord user has to have the role assigned, whose ID is set to the config variable “whitelist.role_id” and the link has to be activated in the link management channel (details in the previous section).
Minecraft Commands
- /discord commands – shows the list of available commands configured in the Discord Integration with a help message what they do.
- /discord gamerules – shows the values of all Minecraft gamerules.
- /discord mods – shows a list of all mods in the server.
- /discord link <player> [<discordMemberId>] – creates a linking between a Discord user and a Minecraft player. From the Discord chat only the variate with only the player can be user and in Minecraft only with player and discordMemberId the command is usable (Only of players with op level 3 or higher).
- /discord unlink <player> [<discordMemberId>] – deletes a linking between a Discord user and a Minecraft player. From the Discord chat only the variate with only the player can be user and in Minecraft only with player and discordMemberId the command is usable (Only of players with op level 3 or higher).
Default Discord Commands
If you type the following commands into the discord chat, you get information from the Minecraft server. Custom commands can be added in the config.
Commands for Vanilla Minecraft:
- !difficulty – shows the difficulty of the server.
- !gamerules – shows the gamerules and their values.
- !help – shows all commands with its description.
- !link <Minecraft player name> – links a Minecraft player with the Discord user using this command.
- !mods – shows a list of the mods on the server.
- !online – shows how many and which players are on the server.
- !seed – shows the seed of the active world.
- !time – shows the current day time on the server.
- !tps – shows the tps statistic of the server, and it’s dimensions.
- !unlink <Minecraft player name> – unlinks a Minecraft player from the Discord user using this command.
Commands for the Dimension Access Manager Mod
- !dimensions – shows the access states of all dimensions.
Commands for the More MobGriefing Options Mod
- !mobgriefing – shows all mobgriefing options of the mobs.
How to use:
First you have to log into the Discord Developers Site.
Press “New Application” and enter a name for your application.
Go to the “Bot tab” and click “Add Bot”.
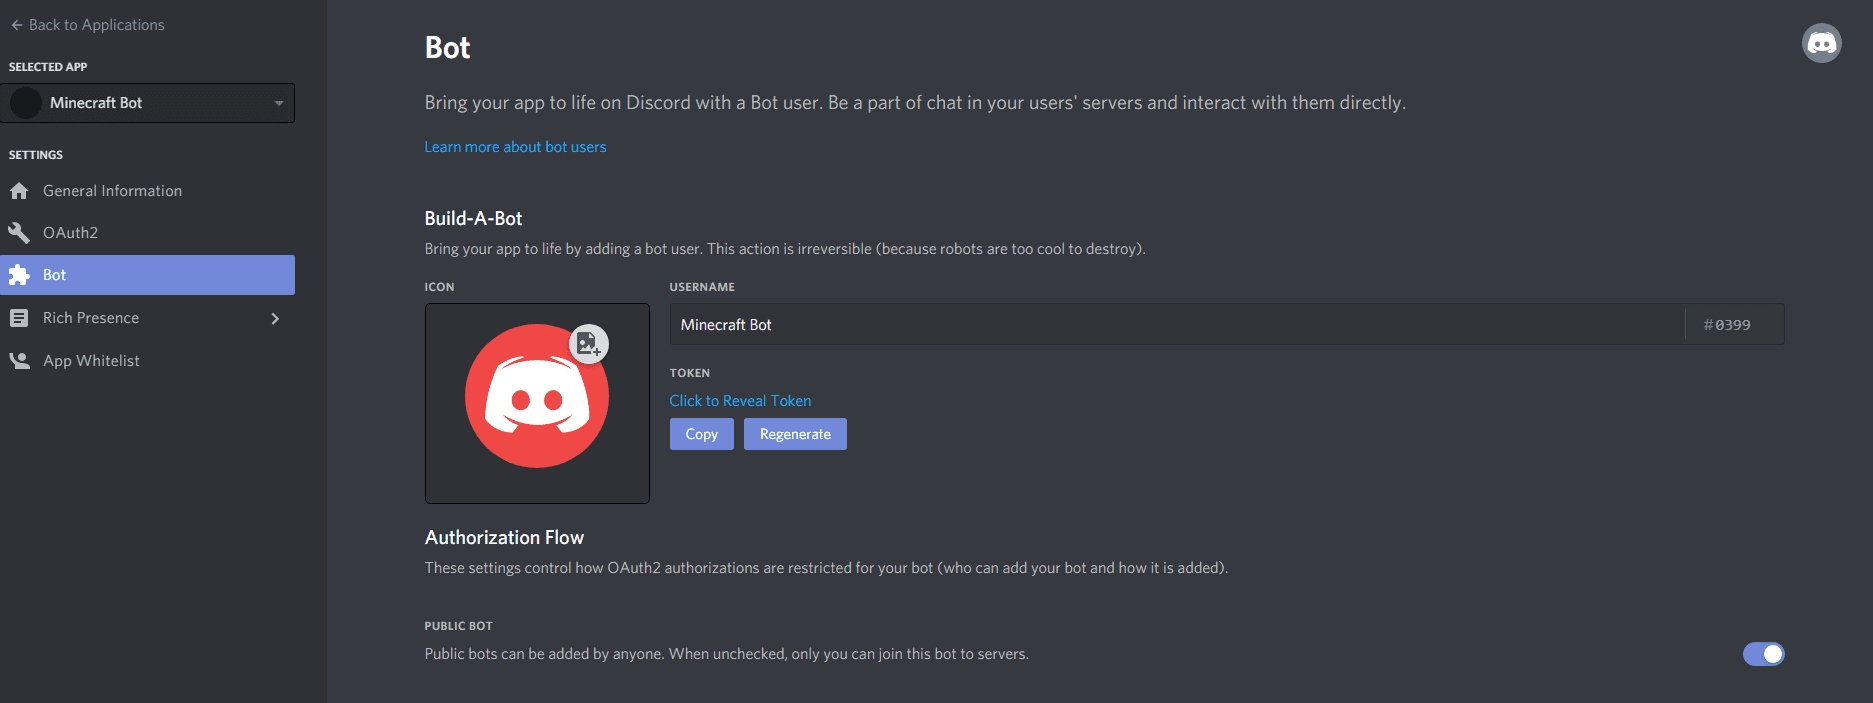
Click onto “Click to Reveal Token” to get the bot token for the config.
To add the bot to a server click on “General Information” and add the “Client ID” into the following link:
https://discordapp.com/oauth2/authorize?client_id=YOUR_BOTS_CLIENT_ID&scope=bot&permissions=3072
You have to replace YOUR_BOTS_CLIENT_ID by the client ID of your bot.

Open this link and add the bot to one of your server.
You can only add the bot to your own servers. If you want to add the bot to a server, that you don’t own, you have to check the “Public Bot” option in the Bot tab and let the server owner add the bot to his/her Discord server.
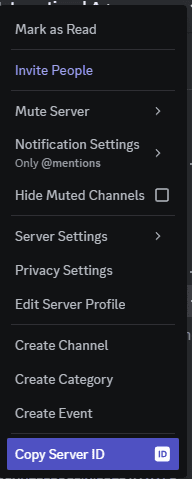
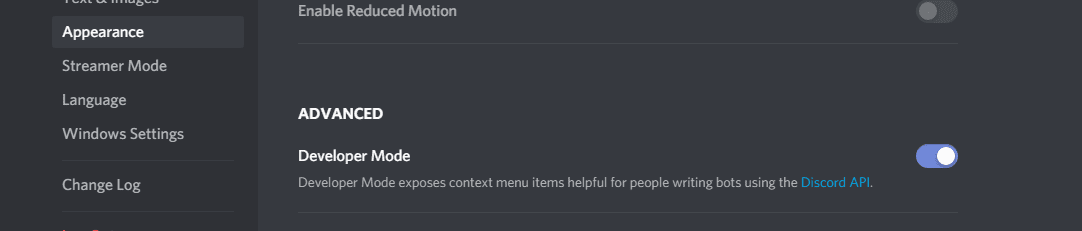
How to get the guild ID
To get the guild ID, you have to go in Discord into the “User Settings” > “Appearance” and have to activate the “Developer Mode”

Next, you go to the server in which the bot shall operate.
Make a right click on this server name or icon and click “Copy Server ID” and paste it into the config.
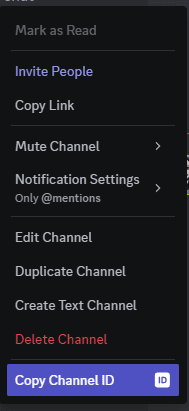
How to get the channel ID
To get the channel ID, you have to go in Discord into the “User Settings” > “Appearance” and have to activate the “Developer Mode”

Next, you go to the server and channel in which the bot shall operate.
Make a right click on the channel and click “Copy ID” and paste it into the config.
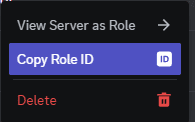
How to get the role ID
To get the role ID, you have to go in Discord into the “User Settings” > “Appearance” and have to activate the “Developer Mode”
Next, you go to the server in “Server Settings” > “Roles”.
Make a right click on the role and click “Copy Role ID” and paste it into the config.
Requires:
How to install:
How To Download & Install Mods with Minecraft Forge
How To Download & Install Fabric Mods
Don’t miss out today’s latest Minecraft Mods
Discord Integration Mod (1.20.4, 1.19.4) Download Links
For Minecraft 1.14.4
Forge version: Download from Server 1
For Minecraft 1.15.2
Forge version: Download from Server 1
For Minecraft 1.16.5
Forge version: Download from Server 1
For Minecraft 1.17.1
Forge version: Download from Server 1
For Minecraft 1.18.1
Forge version: Download from Server 1
For Minecraft 1.18.2
Forge version: Download from Server 1
For Minecraft 1.19.2, 1.19.1, 1.19
Forge version: Download from Server 1
For Minecraft 1.19.3
Forge version: Download from Server 1
For Minecraft 1.19.4
Forge version: Download from Server 1
For Minecraft 1.20.1, 1.20
Forge version: Download from Server 1 – Download from Server 2
Fabric version: Download from Server 1 – Download from Server 2
For Minecraft 1.20.2
Forge version: Download from Server 1
Fabric version: Download from Server 1 – Download from Server 2
For Minecraft 1.20.4, 1.20.3
Forge version: Download from Server 1 – Download from Server 2
NeoForge version: Download from Server 1 – Download from Server 2
Fabric version: Download from Server 1 – Download from Server 2
Tags:
YOU MAY ALSO LIKE...