Factorization Mod
 169,380
 1
1
 August 1, 2016
What Factorization Mod does?
Factorization Mod adds minimalist parts for expanding vanilla redstone automation, along with many other things.
Factorization Mod Screenshots:
Factorization Mod Video:
Factorization Mod Recipes:
Show More
The Pocket Crafting Table
Did somebody order a 3×3 crafting grid to go? Craft directly from your inventory, at any time! Press ‘c’ to use. Of course, you’ll have to clear out that extra junk in your inventory before you can use it. But don’t worry; with this mod, that won’t be a problem for long! If you have NEI installed, you can use it while in other GUIs. If you press the ‘c’ key with the window open, it will drag and rotate the items around the perimeter. If you press the ‘b’ key, it will balance the item stacks. The ‘x’ key will try to clear the crafting area.
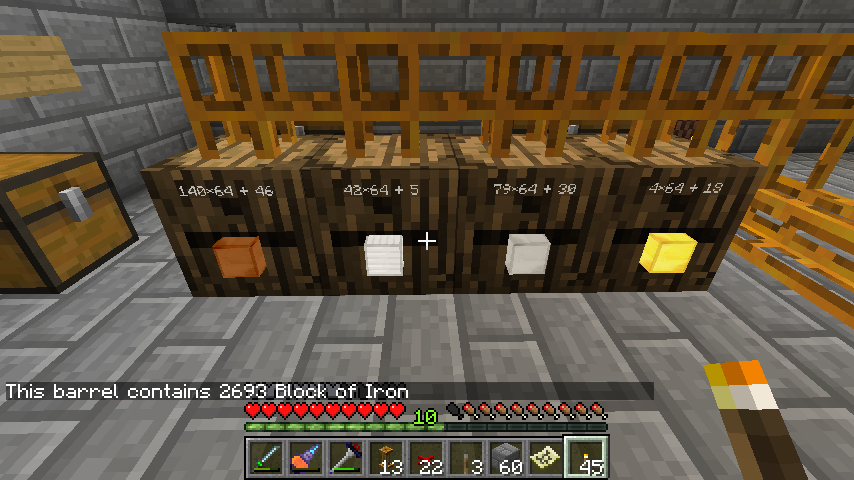
The Almighty Barrel
Based on item-stockpiling technology discovered in the recently abandoned Fortress of Nod Semor, the barrel can store 64 stacks of a single item type. Never fill a chest with cobblestone again!
Right click a barrel with an item to drop it in; left-click to remove. Double-right clicking will dump all of the matching items in your inventory into a barrel, left-click will pull a stack out, and shift-left click will pull out a single item.
Is 64 stacks not nearly enough for your cobblegen? There’s an upgrade for that…
The Crafting Machines
The crafting automation tools found in certain other mods makes automatic crafting far too easy. This crafting system has two machines, the Maker and the Stamper. These machines need to be used with (for example!) RedPower’s tube system to make them actually be automatic.
The Maker makes craftpackets. This is fueled by paper, which goes in the bottom slot. Then you need to select which crafting slots items will go in. Place items in the top slot to put those items into a craftpacket. When there are items in all the selected slots, the craftpacket will be moved to the right slot. If the craftpacket is blue, that means it can be crafted into something.
Place craftpackets in the left slot of stamper to craft the packet. If you place an invalid or incomplete craftpacket in, the contents will be dumped to the other slot. You can also put in, for example, bones to get bonemeal. If a recipe has multiple results, such as for making cake, all the other used ingredients will be placed into the output slot.
This is how you can make an axe.
Here is a simple sword machine. Press button, receive sword!
There is another crafting machine, the Packager, which will try crafting a 3×3 or 2×2 grid full of whatever item you give it. This is quite useful for automatically making bricks and metal storage blocks.
Silver Ore
This mod adds silver ore. It can be found between y-level 7 and 55. It generates in fairly large blobs that are bigger than coal veins. However, it is somewhat rare. Only one silver ore vein can be found in a chunk, and most chunks don’t have one.
The Slag Furnace
The slag furnace works similarly to the vanilla furnace, but has an extra output slot. It also uses twice the fuel. For most ores, it will produce an ingot with a low chance of making two instead of one, and also some stone. Silver ore will make silver ingots and lead ingots. Silver is used for mirrors, and lead is used for electrical wiring.
Diamond Shards
The recipe for Diamond Shards is very expensive and volatile. Diamond Shards can only be safely created in a Stamper. (You can make the Craft Packet directly from a crafting table.)
(This picture is old, it now gives 18 shards)
Electric Charge
The electricity system in this mod is called Charge. The first electrical component is a battery. Batteries are made with acid, lead, and iron.
The first thing to do with a battery is to use it to create a magnet. To do that, we need some wire…
…and an iron ingot. Wrap the wires around the iron bar, and connect both ends to the battery to magnetize the iron:
This will drain much of the energy out of the battery, but there’ll be enough left to magnetize a second iron bar. To recharge the battery, we’ll need to make a solar turbine, and a few mirrors.
To make the turbine, we’ll need a motor, and a fan. Magnets are needed, and quite a few insulated coils. Slag all that silver ore! You’ll use much of your lead making coils.
To power the solar turbine, you need to use the silver to craft a few mirrors.
You’ll need to place a good number of them around the solar turbine. The turbine itself needs access to water, so make an infinite water source beneath it.
This is nearly the maximum amount of mirrors you can use:
Back to wires:
Wires can be run up walls, but must be supported by a solid block. You’ll also need to place a bit of wire to go over corners. You can place a wire on top of another wire to do this. If you don’t like the way a wire looks, you can try replacing it while holding shift.
You can measure the charge in wires (and in other things) using the Charge Meter:
This will show you how much charge is in the block you clicked on. It may also give other info.
Machines and Ore Processing
All of these machines require charge to run. Here’s a bunch of crafting recipes:
The heater should be placed next to a furnace, a slag furnace, or a crystallizer. It will provide heat to the furnaces, and will heat the solution in the crystallizer. It takes about 5 mirrors to run a heater. You can put multiple heaters by a block to pump extra heat into it. This will make it reach max temperature quicker, and run faster.
The grinder will grind ores. This is the start of the full ore processing chain. It takes 11 mirrors to get it started, and once it’s at full speed, only needs half the power. Obtaining the Dark Iron Ingot is described in “Demons and Wrath”.
The mixer mixes up various materials with water. It needs only 2 mirrors to run.
The crystallizer must be heated up with a heater, but it only for a brief period of time. After that, it must be left alone to cool off as the crystal forms. This process takes 20 minutes. If you put more material in the extra slots, they will crystallize in parallel. This lets you process up to five stacks at once in a single crystallizer.
Ore processing allows you to get extra ingot yields from your ores, ranging from 120% (using merely a slag furnace) to 300% (using several steps, ending with crystalline metal). This steps work with Iron, Gold, Lead (the primary metal in Silver Ore), and also Copper and Tin.
This got formatted badly. MCF needs to lern2table. Someone who isn’t me can fix it.
Ore                                The block you know and love.
                                          Smelt: 100%   Slag: 120%
↓ Grind in a Grinder ↓
Ore Gravel                      Ground up by sharp diamond shards, it is now ready for further processing.
                                          Smelt: 140%   Slag: 160%
↓ Wash with water from a bucket in a Mixer ↓
Clean Gravel              Many silicates and other natural contaminates have been washed off the ore.
                                          Smelt: Still 140%
↓ Reduce in a Slag Furnace ↓
Reduced Chunks          The ore has now been deoxydized, and is quite clean.
                                          Smelt: 200%
↓ Purify in a Crystallizer using Sulfuric Acid ↓
Crystalline Metal        The metal has been dissolved in acid, heated, and then cooled slowly, allowing the
                                          formation of a metallic crystal. No impurities remain. Just smelt it to get an ingot.
                                          Smelt: 300%
Here’s how to crystallize lead:
You don’t need to process all the way! You can stop whenever you want. But the farther you go, the better yields you will get.
Wrath
All of these recipes require access to a fully stocked Nether Fortress.
The Wrath Igniter
Wrathfire is a very special kind of fire. It will only burn on the block you clicked on, and will spread very quickly on it. Plant materials will burn away, obsidian will liquify into lava again, ice will vaporize instantly, and various forms of stone and other materials can be converted to another and back. When the fire dies, it will leave behind lots and lots of normal fire, which is much less picky about what it burns, so beware. There are two particularly important fuels for Wrathfire: Netherbrick, and iron blocks. Netherbrick will never be burned up: instead, the Wrath Fire will not spread, and can be kindled eternal. Using this property, a Wrath Forge can be built.
A Wrath Forge needs to have a certain amount of netherbrick, or else the Wrath Fire will die out. Placing fuels, such as Iron Blocks, next to the Wrath Fire will burn it, but will also weaken the fire. If the fire becomes weak enough, it will be extinguished.
Dark Iron
Burning an iron block with Wrath Fire will leave behind a Dark Iron block. This block can be uncrafted into 4 Dark Iron ingots. This metal appears to be Ender-aligned, and has a few good uses.
The Item Router
The Item Router is a very flexible, very powerful machine. Making it requires the 3rd material Nether Fortresses provide: blaze powder, which is necessary for an Eye of Ender.
The Router is a block that creates an item delivery network out of blobs of machines that are all next to eachother. (What I mean by “machine” is a block that has a permanent inventory, such as a chest or furnace.) The router will visit each machine and either take or give a single item, depending on the mode set in the GUI. You can change what direction the machine is accessed from, or you can access a specific item slot.
The Item Router has a number of upgrades that can be applied to it by shift-right-clicking the router with the item in hand. This will add a “–” button in the GUI, which you can press to look at each upgrade. To remove an upgrade, press Delete while hovering the mouse over the button.
Item Filter
This lets you choose what items to extract from machines. This upgrade does nothing in insertion mode.
Machine Filter
This lets you choose what machines to access. In the default mode, “visit all”, machines that don’t match will just be skipped over. In “visit near” mode, the router will not pass through non-matching machines. For example, if it’s set to match only chests, a network setup like “router chest furnace chest” will only access the first chest. It will not even look past the furnace. In “visit all” mode, it will visit both chests, but otherwise ignore the furnace.
Speed Boost
This will ease some of the traveling and searching speed restrictions on the router. This is useless for small networks.
Thoroughness
This upgrade will make the router wait at a machine until it is completely full or empty.
Bandwidth
This will cause the router to move entire stacks at a time instead of single items.
Ejector
This upgrade will send received items into an adjacent inventory. It will need to be combined with a machine filter to prevent infinite item cycling.
Logic Matrices
The Logic Matrix is created in a crystallizer using a new substance, Inverium. They are used to craft a few of the more advanced upgrades. To make a blank logic matrix, you need to crystallize a block of lapis lazuli with an Inverium droplet with water from a water bottle. This blank slate must be programmed using a Logic Matrix Programmer, which is an ancient code repository. These are, presently, found in dungeons.
The Wrath Lamp
This lamp will light up a huge area!
The Wrath Lamp’s pretty sweet! It lights up a fairly large area as bright as day. It’ll fill a huge area around it with glowstone-quality light, and this light will flood downward up to 30 blocks. Crafting it will only slightly damage the igniter.
The Bag of Holding
The Bag of Holding can store parts of your inventory for you. The BoH moves the columns to the right of it into itself, and then replaces them with columns that were already inside it. When you first craft it, it will store only 3 columns.
Press ` at any time to put your inventory into the BoH and pull other stuff out. You can add another column of storage to the BoH by crafting it with an enderpearl, a dark iron ingot, and a bit of leather.
The best place to put your Bag of Holding depends on how many columns it stores! A new BoH should go in the 4th column from the right; this way the location of items won’t change as you use `.
Specifically, you’ll want to place the bag such that the number of inventory columns it stores is a multiple of the number of columns to its right.
How to Install:
New to Minecraft? Follow our step-by-step guide to install Mods on your PC.View Guide
Download Links for Factorization Mod :
Factorization Mod Older versions:
Show More
For Minecraft 1.5.1
For Minecraft 1.4.7
For Minecraft 1.4.5
For Minecraft 1.5.2
http://www.mediafire.com/download/0x3gc3kcl4rp4x2/Factorization-0.8.01.jar
For Minecraft 1.6.2
For Minecraft 1.6.4
For Minecraft 1.7.2
For Minecraft 1.7.10
You May Also Like


This post has no comments yet. Be the first — your comment will appear here.