/cam : Shows the current settings of the cam command.
/cam p{number} : Creates or modifies a point which can be used to define a path. The current location and orientation will be saved into memory under the given name (can be p1, p2, p1000 – whatever). Points can be created in any order – the number is just there as an identifier.
Examples :
- /cam p1
- /cam p2
- /cam p1000
/cam p : Creates a new point just like the above command, and names it automatically by incrementing its number. This command will take care of existing points, and so skip existing identifiers if they already exist.
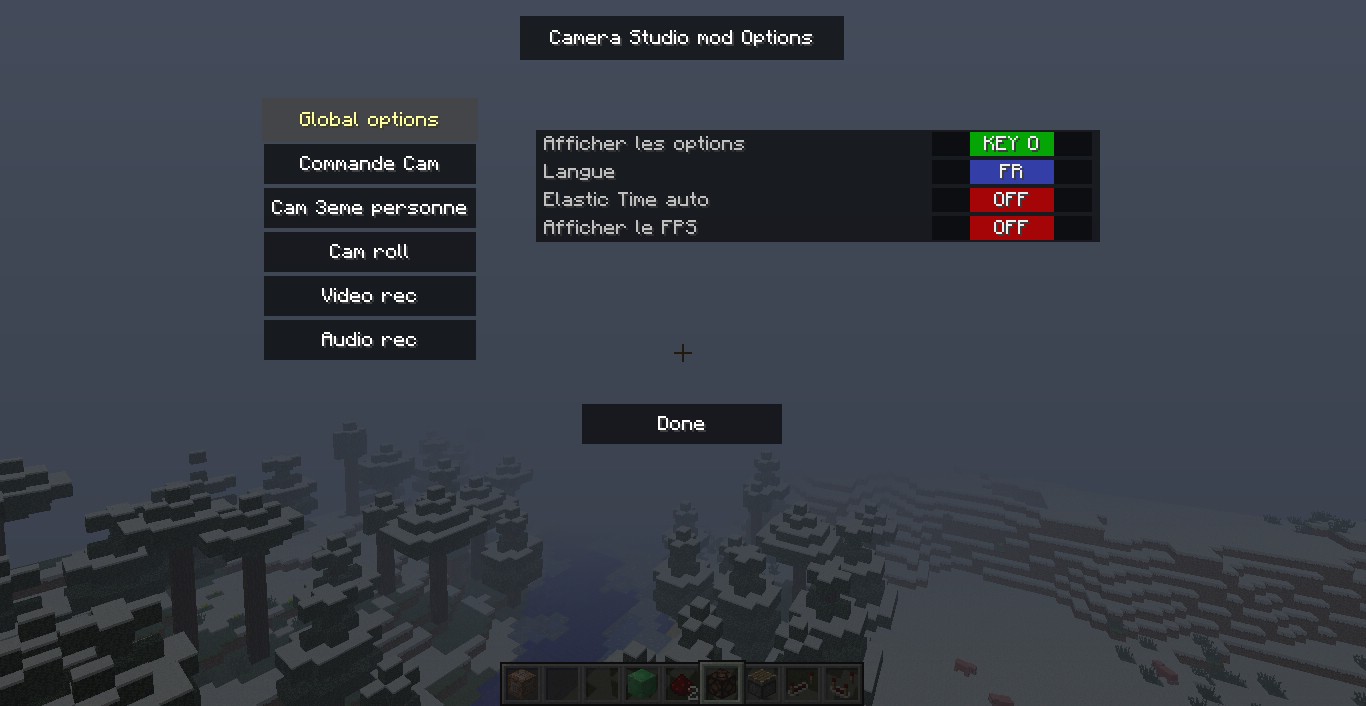
A hotkey now exists for this command (which can be configured through the options screen.
Examples :
- Typing three times /cam p if there are no point defined yet will create p1, p2 and p3.
- Typing three times /cam p if the point p2 already exists will create p1, p3, and p4.
/cam p clear : Deletes all registered points.
/cam undo p{number} : Deletes the point which has the given name. If you create again a point with the same name after, this new point will be pushed in last place in the point list. If you simply want to change a points position or orientation, but want to keep it in the order it was defined, use /cam p{number} directly.
Example :
/cam goto p{number} : Quick navigates to the given point. You must ensure that no solid block lies between you and the given point, else this command won’t be able to achieve the move.
Example :
/cam target : Saves the current location as the only position to look at during the whole camera movement.
/cam undo target : Deletes the point to look at, and reverts to the conventional orientation handling, which is one orientation per point.
/cam orient on|off|target : Changes the orientation handling. on stands for orientation per point handling (which is the default), off stands for free orientation with the mouse, and target stands for orientation defined with a target. Using the /cam target command will automatically switch to the target orientation system.
Examples :
- /cam orient off
- /cam orient on
- /cam orient target
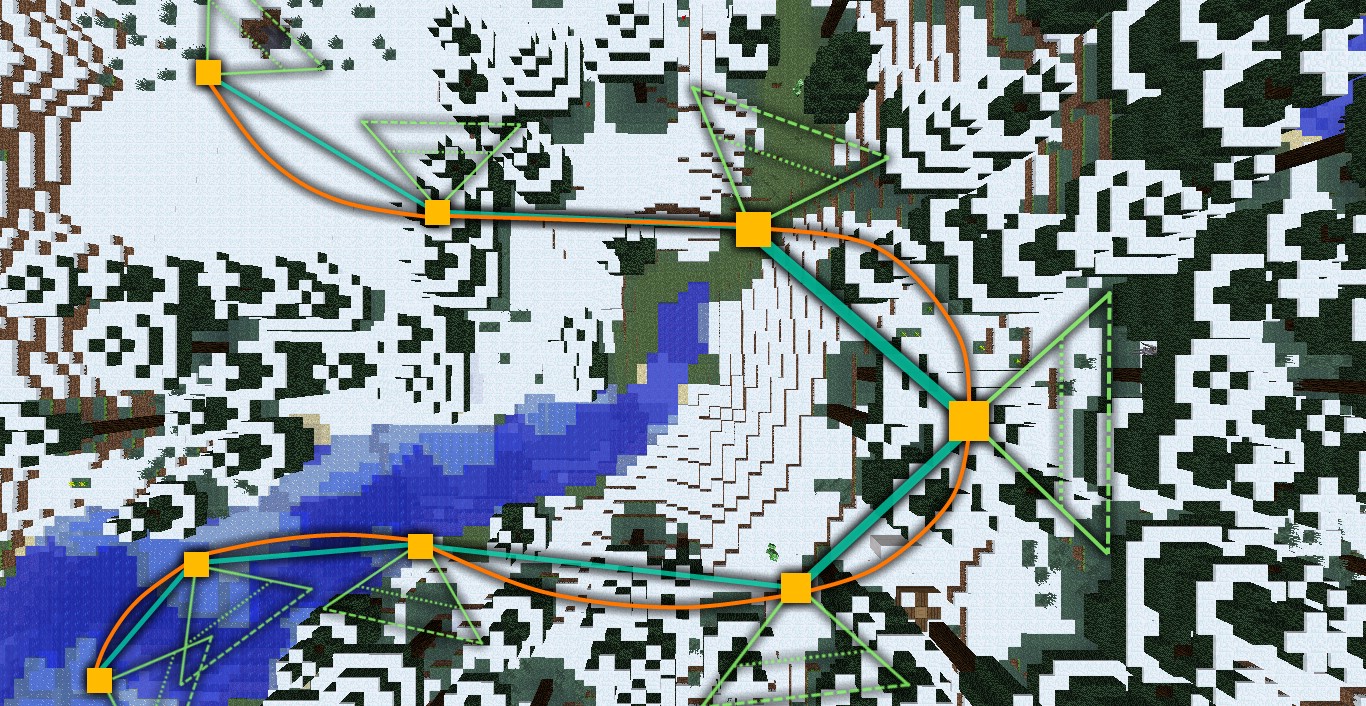
/cam l p{num1} p{num2} : Registers a linear path from p{num1} to p{num2}. The camera will move in a straight direction.
Example :
/cam l : Registers a linear path starting from the next to last point of the registered points list (given with /cam), and going to the last point of it.
Example :
- Given a point list [p1,p2,p3], /cam l registers a path from p2 to p3.
/cam cr|cl p{num1} p{num2} [h{positive or negative value}] [{float value}] : Registers a circular path from p{num1} around p{num2}. The camera will keep p{num1} elevation, whatever circle’s center elevation is. Use cr to turn to the right, or cl to turn to the left. Optional h followed by positive or negative value raises or lowers the camera during the move in order to describe an helix movement (value is an height in cubes, and is defaulted to 0). Optional float value is the number of turns to achieve, which is 1 by default. Also, subsequent calls to this command can omit to give the two points as arguments, and can be used to just change the “height” or “turns” parameters.
Examples :
- /cam cr p1 p2 ; turn from p1 around p2 to the right exactly one time,
- /cam cl p1 p2 0.5 ; turn from p1 around p2 to the left exactly one half time,
- /cam cl p1 p2 h40 ; turn from p1 around p2 to the left exactly one time, and raise the camera for 40 cubes
- /cam cl p1 p2 5 h-50 ; you can mix all options together..
- /cam cl h-50 ; works only if you made a call to “/cam cl p1 p2” prior to this command.
/cam cr|cl : Registers a circular path starting from the next to last point of the registered points list (given with /cam), and going around the last point.
Example :
- Given a point list [p1,p2], /cam cr registers a circular path from p1 around p2.
- Given a point list [p1,p2,p3], /cam cr registers a circular path from p2 around p3.
/cam sp p{num1} p{num2} p{num3} [p{num4}…] : Registers a curvilinear path (a spline) along the given points. The camera will describe a smooth curve movement passing through each given points at constant speed.
Example :
- /cam sp p1 p2 p5 p3 p6 ; starting from p1, go to p2, then p5, then p3, then p6
/cam sp : Registers a spline path along all the registered points, in the order they appear in the registered points list (given with /cam). Adding a subsequent point to this list doesn’t change this path. If you add a point to this list and want to travel through it, you have to call /cam sp again.
Example :
- Given a point list [p1,p2,p3], /cam sp registers a spline path from p1 to p2, and then to p3.
/cam start [{value}s|m|h] : Starts the camera movement for the given time value. With no argument, it will consider the last given time value (default is 5 seconds). Time argument can be expressed in seconds, minutes, or hours.
Note : when a target is used, the mouse input will be locked once the traveling starts, in order not to disturb the traveling if you’re shooting a video. The mouse will get unlocked once the traveling ends, or if the traveling is manually stopped.
Examples :
- /cam start 20s ; do the movement in 20 seconds
- /cam start 20m ; do the movement in 20 minutes
- /cam start 2h ; do the movement in 2 hours
/cam stop : Stops the camera if its motion is still in play. Starting again the camera will play the path from the beginning.
/cam pause : Pauses the camera if it has been started with /cam start, but hasn’t yet finished its traveling. This is useful if you experience whatever problem that forces you to pause or stop your video recording.
/cam resume : Continues the traveling if it has been paused before with /cam pause.
/cam clear : Clears the current settings, and restores to the default state.
/cam save {name} : Saves all the settings entered so far (points, path, and time values) with the given name. This will save the settings in a file located in the “path” dir next to the config file.
/cam load {name} : Load the settings previously saved with the given name. All the current settings will be lost.
/cam list : Lists all the settings saved so far.
/cam bind : Binds the Cam command with the Elastic-time command. A call to /cam start, pause, resume and stop will also start, pause, resume and stop the Elastic-time feature.
This can now be tuned through the options screen.
/cam unbind : Makes the Cam and Elastic-time commands independent (this is the default state).
This can now be tuned through the options screen.
/cam default : Defaults the options which are accessible throuh the options screen. This requires a Minecraft restart for the changes to take effect.
/et : Gives the summary of the Elastic Time command.
/et {value}s|m|h [{value}s|m|h] : Configures the length of each cycle (night and day). If it comes with one argument, the given duration is evenly split for night and day. If it comes with two arguments, the first value is the day length, and the second is the night length. Time value can be expressed in seconds, minutes, or hours. Note that this command doesn’t change the time flow by itself : you’ll have to call /et on to do so.
Examples :
- /et 5m ; day and night will last 2 and half minutes each
- /et 30m 20m ; day lasts 30 minutes, and night 20 minutes.
/et on : Starts the Elastic Time command. By default, night and day are configured to last 5 seconds each.
Notes :
- It doesn’t affect the real time on a server – it’s all processed client-side, and you’re the only one to see a time change.
- If you put tiny values (say under a minute), and play on a server, you will probably experience annoying sun and moon jumps, as the time is frequently readjusted by the server, and remains the master clock.
/et off : Stops the Elastic Time command, restoring the default time control.
/et pause : Pauses the command.
/et resume : Un-pauses the command.